Why is it carried out?
The femoral vein is located in the groin area and is one of the large highways that carries out the outflow of blood from the lower extremities of a person.
Catheterization of the femoral vein saves lives, since it is located in an accessible place, and in 95% of cases the manipulations are successful.
Indications for this procedure are:
- impossibility of administering drugs into the jugular or superior vena cava;
- hemodialysis;
- carrying out resuscitation actions;
- vascular diagnostics (angiography);
- the need for infusions;
- cardiac stimulation;
- low blood pressure with unstable hemodynamics.
Indications and contraindications
The following indications for central venous catheterization are distinguished:
- Complex operations with possible massive blood loss;
- Open heart surgery with AIC and in general on the heart;
- The need for intensive care;
- Parenteral nutrition;
- Possibility of measuring CVP (central venous pressure);
- Possibility of taking multiple blood samples for control;
- Introduction of a cardiac pacemaker;
- X-ray and contrast examination of the heart;
- Probing of the cavities of the heart.
Preparation for the procedure
For femoral vein puncture, the patient is placed on the couch in a supine position and asked to stretch his legs and slightly spread them. Place a rubber cushion or pillow under your lower back. The skin surface is treated with an aseptic solution, hair is shaved off if necessary, and the injection site is limited with sterile material. Before using the needle, locate the vein with your finger and check for pulsation.
The procedure includes:
- sterile gloves, bandages, napkins;
- pain reliever;
- 25 gauge catheterization needles, syringes;
- needle size 18;
- catheter, flexible guidewire, dilator;
- scalpel, suture material.
Items for catheterization must be sterile and within the reach of the doctor or nurse.
Patient observation after the procedure
Most complications after a correctly performed manipulation can be avoided if you adhere to the rules of care for the medical device and the place where it is installed. The doctor who performed the catheterization introduces these rules to the patient. After the procedure, a medical facility employee:
- daily examines the skin around the catheter, treats it with antiseptic solutions;
- changes the bandage every day;
- after the end of the infusion, he places a “heparin lock” - a special dilution of heparin is injected with a syringe;
- monitors the integrity of the catheter, prevents its kinks, and does not allow the application of clamps that are not provided for by the design.
The patient should not leave the hospital with a catheter. When transferred to another clinic, he must be accompanied by a health worker. The device must also be removed only by trained hospital staff.
Technique, Seldinger catheter insertion
Seldinger is a Swedish radiologist who in 1953 developed a method for catheterizing large vessels using a guidewire and a needle. Puncture of the femoral artery using his method is still carried out today:
- The space between the symphysis pubis and the anterior iliac spine is conventionally divided into three parts. The femoral artery is located at the junction of the medial and middle third of this area. The vessel should be moved laterally, since the vein runs parallel.
- The puncture site is punctured on both sides, giving subcutaneous anesthesia with lidocaine or another anesthetic.
- The needle is inserted at an angle of 45 degrees at the site of vein pulsation, in the area of the inguinal ligament.
- When dark cherry-colored blood appears, the puncture needle is moved along the vessel 2 mm. If blood does not appear, you must repeat the procedure from the beginning.
- The needle is held motionless with the left hand. A flexible conductor is inserted into its cannula and advanced through the cut into the vein. Nothing should interfere with the movement into the vessel; if there is resistance, it is necessary to slightly turn the instrument.
- After successful insertion, the needle is removed, pressing the injection site to avoid hematoma.
- A dilator is put on the conductor, after first excising the insertion point with a scalpel, and it is inserted into the vessel.
- The dilator is removed and the catheter is inserted to a depth of 5 cm.
- After successfully replacing the guidewire with a catheter, attach a syringe to it and pull the plunger towards you. If blood flows in, an infusion with an isotonic solution is connected and fixed. Free passage of the drug indicates that the procedure was completed correctly.
- After the manipulation, the patient is prescribed bed rest.
Contraindications
Contraindications for central venous catheterization are:
- Blood clotting disorder;
- Inflammatory at the puncture site;
- Clavicle injury;
- Bilateral pneumothorax and some others.
However, you need to understand that contraindications are relative, because if a catheter needs to be inserted for health reasons, then this will be done under any circumstances, because To save a person’s life in an emergency, venous access is needed)
For catheterization of central (main) veins, one of the following methods can be selected:
1. Through the peripheral veins of the upper limb, usually the elbow. The advantage in this case is the ease of execution; the catheter is passed to the mouth of the superior vena cava. The disadvantage is that the catheter can remain in place for no more than two to three days.
We also recommend reading: Premedication in dentistry for children and adults
2. Through the subclavian vein on the right or left.
3. Through the internal jugular vein, also on the right or left.
Complications of central venous catheterization include the occurrence of phlebitis and thrombophlebitis.
For puncture catheterization of the central veins: jugular, subclavian (and, by the way, arteries), the Seldinger method (with a guide) is used, the essence of which is as follows:
1. A vein is punctured with a needle, a conductor is passed through it to a depth of 10 - 12 cm,
2. Next, the needle is removed, a catheter is passed through the guidewire,
3. After this, the guide is removed, the catheter is fixed to the skin with a bandage.
Installation of a catheter under ECG control
The use of this method reduces the number of post-manipulation complications and facilitates monitoring the state of the procedure, the sequence of which is as follows:
- The catheter is cleaned with an isotonic solution using a flexible guide. The needle is inserted through the plug and the tube is filled with NaCl solution.
- Lead “V” is attached to the needle cannula or secured with a clamp. The device switches on the “thoracic abduction” mode. Another method suggests connecting the wire of the right hand to the electrode and turning on lead number 2 on the cardiograph.
- When the end of the catheter is located in the right ventricle of the heart, the QRS complex on the monitor becomes higher than normal. The complex is reduced by adjusting and pulling the catheter. A tall P wave indicates the location of the device in the atrium. Further direction to a length of 1 cm leads to the alignment of the prong according to the norm and the correct location of the catheter in the vena cava.
- After the manipulations are completed, the tube is sutured or secured with a bandage.
Clinical anatomy
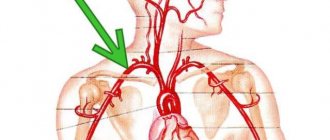
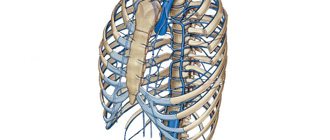
The subclavian vein passes into the axillary vein at the level of the first rib, at its lower edge. It is a direct continuation of it. Here the vein bends around the first rib from above and passes behind the clavicle near the anterior edge of the scalene muscle and is located in the prescalene space. This gap is the frontal triangular fissure, forming a groove for the subclavian vein, which is surrounded by the anterior scalene muscle, the sternothyroid and sternohyoid muscles and the cleidomastoid muscle tissue. In the lowest area of the gap is the subclavian vein.
This vein passes through two points: the lower one is located at a distance of 2.5 cm inward from the coracoid scapular process, and the upper one is 3 cm downward from the sternal edge of the end of the clavicle. In newborns and young children (up to 5 years old), it passes through the middle of the collarbone. With age, the projection of the subclavian vein shifts to the area of the middle third of the clavicle.
The subclavian vein is located as if obliquely relative to the center of the body. The topography of the subclavian vein does not change its location during movement of the arms and neck, since its walls are closely connected with the clavicular periosteum and the first rib, as well as with the clavipectoral fascia and subclavian muscles.
Possible complications
When performing catheterization, it is not always possible to avoid complications:
- The most common unpleasant consequence is a puncture of the posterior wall of the vein and, as a consequence, the formation of a hematoma. There are times when it is necessary to make an additional incision or puncture with a needle to remove blood that has accumulated between the tissues. The patient is prescribed bed rest, tight bandaging, and a warm compress to the thigh area.
- Blood clot formation in the femoral vein has a high risk of complications after the procedure. In this case, the leg is placed on an elevated surface to reduce swelling. Medicines that thin the blood and help resolve blood clots are prescribed.
- Post-injection phlebitis is an inflammatory process on the vein wall. The patient's general condition worsens, a temperature of up to 39 degrees appears, the vein looks like a tourniquet, the tissue around it swells and becomes hot. The patient is given antibacterial therapy and treatment with non-steroidal drugs.
- Air embolism is the entry of air into a venous vessel through a needle. The outcome of this complication can be sudden death. Symptoms of embolism include weakness, deterioration of general condition, loss of consciousness or convulsions. The patient is transferred to intensive care and connected to a breathing apparatus. With timely assistance, the person’s condition returns to normal.
- Infiltration is the introduction of the drug not into a venous vessel, but under the skin. May lead to tissue necrosis and surgical intervention. Symptoms include swelling and redness of the skin. If an infiltrate occurs, it is necessary to make absorbable compresses and remove the needle, stopping the flow of the drug.
Stages of catheterization
The catheterization procedure is most often performed supraclavicularly, since it is most convenient for both the doctor and the patient. Puncture of the subclavian vein is taken in a strict step-by-step sequence.
To perform a successful procedure, you must do the following:
- First of all, local anesthesia is applied to the subcutaneous tissue and skin in the puncture area.
- The skin is pierced with a ten-centimeter needle attached to a 10 ml syringe. This should be a special syringe from a special kit with novocaine. The drug is constantly injected together with the advancement of the needle to flush its lumen and numb the area. After every centimeter of puncture, depending on the patient’s constitution, it is necessary to stop and pull the needle piston back and forth, flushing its lumen. The movement should be continued until you feel the ligament between the collarbone and the first rib.
- At the next stage, pushing the needle forward, there will be a sensation of piercing the vein wall. By simultaneously moving the needle and pulling the syringe plunger towards you, it will be filled with venous blood.
- The next stage is the most important and dangerous - the prevention of air embolism. If the patient is conscious, you need to ask him to stop breathing, then you can disconnect the syringe by quickly covering the needle pavilion with your finger. Now, without further delay, you need to install the port and insert a conductor (metal string or fishing line) through the needle to the required depth, approximately 12 centimeters.
- Now you can remove the needle. Using slow rotational movements, the catheter is inserted through the port along the guide and secured. Explorer can now be removed.
- At this stage, it is necessary to rinse the catheter well. There should be no blood in it. To do this, you need to attach a syringe with saline solution to it. After washing, you need to make sure that venous blood flows freely through the catheter and exclude thrombosis of the subclavian vein.
- Now you can begin fixing the catheter. To do this, it must be sewn to the skin with silk threads. Knots must be tied after each suture, around the catheter itself, and also, for reliability, around its pavilion. All necessary areas, as well as the port, can be fixed with the same thread.
- At the final stage, you can attach the dropper. To avoid the development of arrhythmia, the tip of the catheter should be left at the mouth of the superior vena cava, but not in the right atrium.
Peripheral vein catheterization
Of the peripheral veins, the most preferable in terms of puncture are the lateral and medial vein of the forearm, the intermediate ulnar vein, and the vein on the back of the hand.
peripheral vein catheterization
The algorithm for inserting a catheter into a vein in the arm is as follows:
- After treating the hands with antiseptic solutions, the required catheter size is selected. Typically, catheters are marked according to size and have different colors - purple for the shortest catheters with a small diameter, and orange for the longest with a large diameter.
- A tourniquet is applied to the patient's shoulder above the catheterization site.
- The patient is asked to “work” with his fist, squeezing and unclenching his fingers.
- After palpation of the vein, the skin is treated with an antiseptic.
- A puncture of the skin and vein is performed with a stiletto needle.
- The stiletto needle is pulled out of the vein while the catheter cannula is inserted into the vein.
- Next, a system for intravenous infusions is connected to the catheter and medicinal solutions are infused.
Video: puncture and catheterization of the ulnar vein
Catheter Care
In order to minimize the risk of complications, the catheter must be properly cared for.
Firstly, the peripheral catheter should be installed for no more than three days. That is, the catheter can remain in the vein for no more than 72 hours. If the patient requires additional infusion of solutions, the first catheter should be removed and a second one should be placed on the other arm or in another vein. Unlike a peripheral one, a central venous catheter can remain in the vein for up to two to three months, but subject to weekly replacement of the catheter with a new one.
Secondly, the plug on the catheter should be flushed with a heparinized solution every 6-8 hours. This is necessary to prevent blood clots in the catheter lumen.
Thirdly, any manipulations with the catheter must be carried out according to the rules of asepsis and antisepsis - personnel must carefully wash their hands and work with gloves, and the catheterization site must be protected with a sterile bandage.
Fourthly, to prevent accidental cutting of the catheter, it is strictly forbidden to use scissors when working with the catheter, for example, to cut the adhesive tape that secures the bandage to the skin.
The listed rules when working with a catheter can significantly reduce the incidence of thromboembolic and infectious complications.